^_^ Ok... I finally finished the Drawing Tips Outline. This is just the basic structure of how to draw a person... or course there are variations for different people and what not but for now... just practice this getting the measurements (as in proportions). Some animes will have elongated arms and legs... and some have very slender faces... and what not... etc.
Well I hope that this small little guide will be of some help.
SOME HELPFUL TIPS:
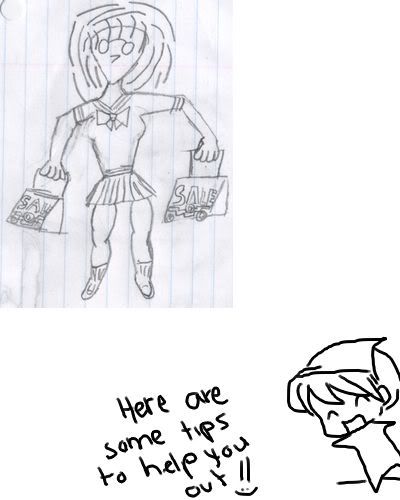
A step by step guide for learning to draw a person
STEP 1: Basic Face Shape
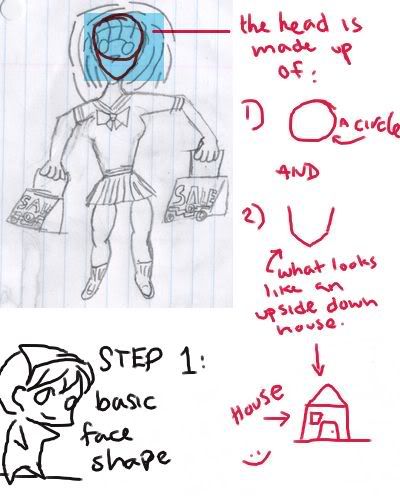
Start out buy drawing a circle... don't think of it as being a head... just think of it in terms of shapes. Then... draw and upside down house outline (don't add in the door, window and roof though... lol ^o^)!
STEP 2: More Basic Shapes... The Body
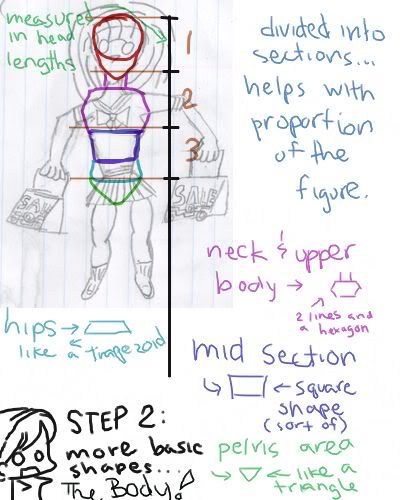
Now... since you have the head drawn now... beside your figure draw a vertical line (not to close to the figure though... leave some space so you can draw out the figure). On the vertical line... you will now divide the sections into head lengths... NOTICE: how I numbered the areas 1, 2, 3.... do that before you draw any other parts of the body... but instead of just going to 3... go all the way from 1 to 7 (or even to 8 if you want).
Next you will draw out the neck and upper body. For the neck... make two lines... don't put the lines too close together... otherwise the neck will look to skinny... O.o"!
For the body make a hexagon kind of shape. This will make up the bust of the character... next add in the torso (mid. section)... it is like a square
but curves up a little more.
Then for the hips draw a trapezoid shape. Notice how all the pieces connect with each other. In the 3rd block (the area measured in head lengths) the torso and hips should be in that section. [ Again... this varies from person to person... but for now just stick with this outline until you get it down].
STEP 3: Arm Structure
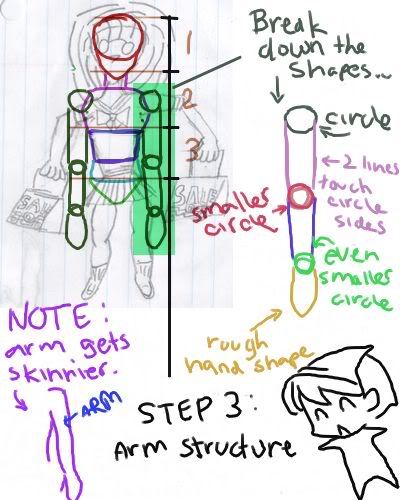
Break down the shapes... and make sure to follow the side guide lines... if you are finding your arms are coming too short or too long... take a second look and see what section each part should line up to.
Sometimes when drawing... we may become impatient or try to rush things (I do that at times too)... but DO NOT RUSH AHEAD... go slow and follow along step by step.
Place the first two circles on the sides of the hexagon... on the top flat angled surface... notice that they over lap a bit of the purple hexagon lines.
As you continue drawing the arms... notice where the second circle meets up... it is at the end of the Torso and the beginning of the Hips. Keep that in mind... if you notice your elbow circle is not in the proper place... erase it and correct it... otherwise your person will look as if their arms are too small or too long.
Each circle as you go along in the arm is smaller than the previous one (the one before it) This accounts for our arm structure... the shoulder is bigger than out elbow and our elbow is bigger than out wrist. ^_^
Then place a mitten like thing for a hand... Don't add in details... the Key Thing is getting the OVERALL structure first.
STEP 4: Leg Structure
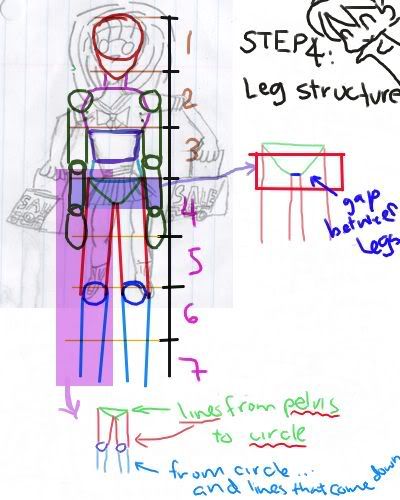
For this one I completed the guide lines... it makes it much easier to line up the figure proportionately... don't worry about posing the figure or bending the characters legs or arms... You want to get familiar with the actual alignment of the figure first!
The legs... when starting the lines join them to the outside of the pelvis... the top corners of it. Notice the gap in between the legs... be sure to leave a bit of a gap.
Where section 6 begins, the top of the knee circles should touch (be sure to keep following the measured head length sections). Then add some lines down from the knees.
STEP 5: Ankles and Feet
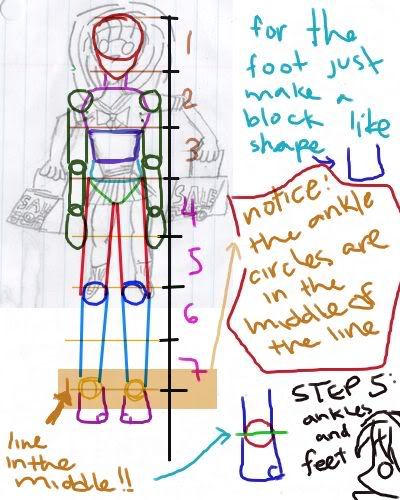
Next... you will add in the ankles... The circles of the ankles should be a bit smaller than those used for the knees... but that is up to you... depending on how thin of thick you want your person's ankles to be... (Remember... don't make them too skinny... otherwise it will look like their ankles won't be able to support the characters weight o_o!)
Look at where section 7 ends... you want to have the ankles line up on that imaginary line.... so that where section 7 ends it will have half of the ankle circle above the end line... while the other half is below the line.
The feet need to be added. You may be wondering why I drew the feet like that... I just put in a square like shape to represent where the feet will generally go (it is the same thing as we did for the hands... but instead of using a mitten shape we use a square kind of shape to represent the flat aspect of the foot)
STEP 6: Overview
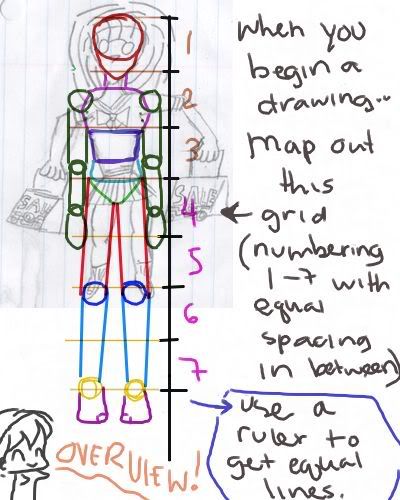
The overview is meant to show you what we have done... and to re-enforce the fact of placing in this grid/ guide lines. Since you are beginning you will want to stick to this template for now... Don't worry about adding in detail right now... just focus on the shapes.... and creating the underlining of the figure... when you have that down... then we can go onto the next step (which is the details).
STEP 7: Back to Where We Started
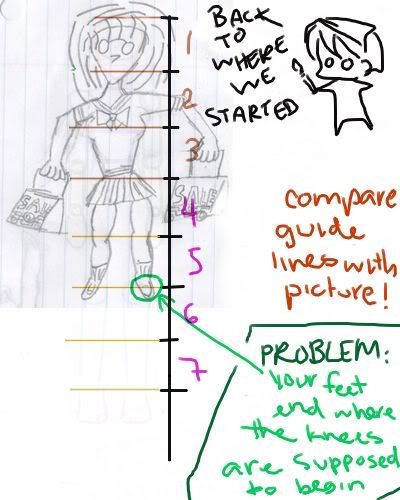
This is to show you what areas you need to focus on... I just pointed out one of them... which was the legs... Your legs ended too short... infact... they ended where the knees are actually supposed to begin. When you just drew it by free hand you may not notice the proportion changes... but when you place a guide line next to it... it allows you to see the picture fully... and to catch any errors like that.
You did an awesome job on the head though... it is in the proper alignment... and the body... the bust area is looking good... you just need to expand the torso a bit as well as the hips and pelvis.
Try to place the characters arms at the side for now... I know that it isn't a really fun pose or anything but when you learn the basics first... then you can expand on that... and then challenge yourself to go further.
STEP 8: The Final Step
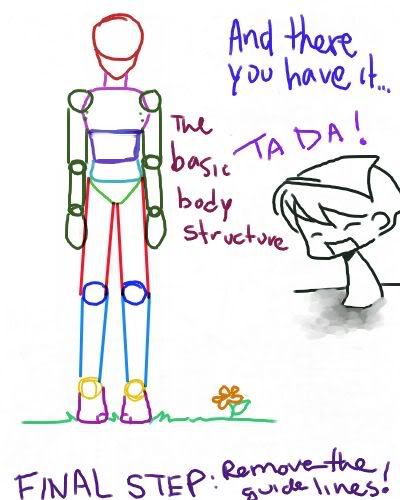
Remove the Guide Lines.... now you can see the figure as being a whole rather than a bunch of small pieces.
TA DA... and there you have it. ^_^ I wish you the best of luck... and REMEMBER... the MOST IMPORTANT THING IS.....
TO HAVE FUN !!! =^_^=
Well I hope that this helps you out.
[sorry for the long post...
sweatdrop xd ]


