|
|
|
|
|
|
|
|
|
 Posted: Tue Oct 27, 2009 9:32 pm Posted: Tue Oct 27, 2009 9:32 pm
|
|
|
|
|
|
|
|
|
|
|
Posted: Wed Oct 28, 2009 4:53 am
|
|
|
|
|
|
|
|
|
|
|
|
|
|
|
|
|
|
|
|
|
|
Posted: Wed Oct 28, 2009 7:34 am
|
|
|
|
|
|
|
|
|
|
|
|
|
Posted: Wed Oct 28, 2009 9:38 am
|
|
|
|
|
|
|
|
|
|
|
Posted: Wed Oct 28, 2009 11:17 am
|
|
|
|
|
|
|
|
|
|
|
|
|
Posted: Wed Oct 28, 2009 11:47 am
|
|
|
|
|
|
|
|
|
|
|
Posted: Wed Oct 28, 2009 12:28 pm
|
|
|
|
|
|
|
|
|
|
|
|
|
|
|
|
|
|
|
|
|
|
Posted: Wed Oct 28, 2009 1:42 pm
 |
|
|
|
|
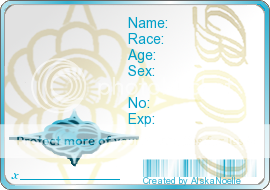
I think it would be wise for instructions on how to put information and avatars on the cards to be typed into the first post, since it seems we've got quite a few who don't know how to do it. And explaining it over and over would certainly grow tiresome.
I'll type up an explanation now, you can copy-paste it into the first post if you want, or just type up your own version. -shrug-
NOTE: My methods might be a little more round-about than other peoples'.
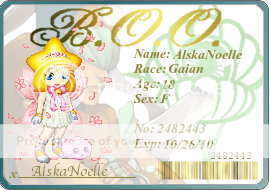
Filling Out an ID Card
~*Getting the ID Card to Edit It*~
1.) Right-Click the image(in this case, the blank ID card you want) and click "Copy" or "Copy Image"
2.) Open MSPaint (by clicking Start, All Programs, Accessories, and then Paint) and then click Edit and then Paste. The image(ID Card) should appear in MSPaint.
(Any instructions on the other art programs may be added as A.) B.) C.) etc...)
~*Getting your Avatar onto the ID Card*~
1.) Make sure your avatar is saved in the outfit you would prefer to have on your ID Card.
2.) On MSPaint, there are little dark blue squares around the space your image is in. If there isn't already enough room for you to place your avatar and some text outside the ID card, hover your mouse over the bottom-right square. A double-headed arrow should appear.
3.) Click and hold down the mouse button and drag the pointer(mouse) so the space around the image gets larger. (Note: You most likely will not see the space get larger until after you let go of the mouse button. Also, the pace does not increase on the top and left sides of the ID Card.)
4.) Click the Select button on the left toolbar in MSPaint. (It should be a rectangle with a dotted outline). Hover your mouse pointer anywhere in the image space. Right-Click and then click "Paste". Your avatar should pop up with a dotted outline around its borders.(It may also be inside a black rectangle.) Click and hold down the mouse button with the pointer on the image and drag it off the ID Card.
A.) If your avatar is in a black rectangle and is black in places where it should be white, open another MSPaint window without closing the current one out.
B.) Go to a thread where your avatar(with the outfit you want on, of course) is visible and chit the Print Screen button with your avatr completely visible on the screen. Go into the new, empty MSPaint window and Paste in the screenshot like you did with the ID Card or your avatar.
C.) Use the Select Tool to select your avatar. Copy it (like you did the blank ID Card) and paste it into the window with the blank ID Card in it. Be sure to move it away from the ID Card and any other image that may be in the way. Be sure to increase your space around the ID Card if you have to.
5.) If you look below the left tool bar in MSPaint, you should see two icons, one is shaded in blue and should probably be the top one. It has come geometric shapes in it. Click the one on the bottom so that it is shaded in blue.
6.) With your avatar selected and now made transparent(by following step 5), drag your avatar into position on top of the ID Card. (If any places on your avatar are a color it should not be, fill in those places with white)
~*Filling in the Info*~
1.) Using the Text tool (should be a big A on the left tool bar) enter in the information for your card. You can either type it in right on the card, or you can type it up beside the card to select and drag it into place. Making the text match the color of the preexisting text on the ID Card makes it look nicer. To make it more authentic, use a Font that mimics a cursive handwriting.
~*Finishing the ID Card*~
1.) Once everything is in place on the ID Card, select it so that only the card is selected. (Doing so may take a little time, so try to have patience).
2.) Copy the selected and filled out ID Card.
3.) You can either open up a new MSPaint window and make the image space in the new window as small as possible, or just do that with the current window.
4.) Paste the ID Card into the small space. MSPaint should automatically make the space grow to fit in the ID Card.
5.) Click File and then Save so you can save your card.
6.) Once your card is saved, use photobucket or imageshack to upload it, copy the URL (Direct Link) and then paste it into your signature(if you wish to) using this
[img]PUT THE IMAGE'S URL HERE[/img]
7.) Save your signature(or profile), if you put it in there. And viola! Your card is done.
|
|
|
|
|
|
 |
|
|
|
|
|
|
|
|
|
|
|
|
|
|
|
|
Posted: Wed Oct 28, 2009 1:43 pm
|
|
|
|
|
|
|
|
|
|
|
Posted: Wed Oct 28, 2009 2:23 pm
|
|
|
|
|
|
|
|
|
|
|
|
|
Posted: Wed Oct 28, 2009 3:01 pm
|
|
|
 |
Le Ronnie Not sure if anyone is interested in this, but in the other BOO ID thread, someone mentioned making B.O.O Badges. I made one and stufffff.  Anyone interested? I made them in other BOO colors too. 3nodding
We have ID cards.....BADGES R THE NEXT BIG THING AND THEY R COOL LIKE DIS ONE |
|
|
|
|
|
|
|
|
|
|
|
|
|
|
|
|
|
|
|
|
Posted: Thu Oct 29, 2009 2:15 am
|
|
|
|
|
|
|
|
|
|
|
|
|
|