|
|
|
|
|
|
|
|
|
 Posted: Fri Oct 22, 2004 11:47 am Posted: Fri Oct 22, 2004 11:47 am
|
|
|
|
|
|
|
|
|
|
|
 Posted: Fri Oct 22, 2004 11:48 am Posted: Fri Oct 22, 2004 11:48 am
 |
 |
 |
 |
Introduction.
To start off i'll briefly explain the difference between vector and raster based images, though i vaguely remember someone else already posting that information somewhere else in the guild forum. Raster objects are graphics made of pixels (they appear in Photoshop), which (as i'm sure everyone knows) are dots of color making up certain images you'll see on your computer. With raster based images the quality of the image will decline as you increase their size because the resolution (amount of pixels in an area) will not change. The bigger you make the image the more you'll see the pixels spredding out, creating a grainy icky look. Vector images are made of mathematical equations and are infinitely scalable. This means you can make a vector based image as big as you want and the quality will not decline. Objects made with Illustrator's pen tool are vector based images.
The reason i explained that is because it's one of the bonuses to being able to easily use Illustrator's pen tool. The drawings you create are easily manipulated for your needs and will not degrade in quality. Though people who are familiar with Photoshop's pen tool (which is also good to master as it's probably the best way of selecting objects in Photoshop) may not see a reason to learn Illustrator, its pen tool is far superior to the one in Photoshop. Though incredibly similar to one another, both tools have their own individual quirks that can make learning Illustrator's version frustrating to learn if you've been using the Photoshop pen tool (and vice versa, as i had difficulty learning the Photoshop pen tool since i was so used to the Illustrator one). The one in Illustrator allows the user more versitile control and exact manipulation of the line art they create and greatly simplifies the basic commands needed to begin using it. What's more, everything you create in Illustrator can be imported into Photoshop anyway. So being able to color Illustrator's line art with Photoshop's image editing abilities is quite possible and is actually a very common technique among Graphic Designers, Animators, and Illustrators.
For a sample of what Illustrator can do, flip through "How to Create Virtual Beauties" by Agosto. The first artist featured, Tsukune, does his section on combining Illustrator, Photoshop, and Painter to create manga/anime characters. The book is horrendous as far as learning anything goes, but it features some greate artists. You can also go to [link=http://homepage3.nifty.com/tsukune/]Tsukune's Website[/link] to look at some good examples of what Illustrator can do.
Basics.
The way i set this up, there are images with most of the steps to make it easier to understand what i'm explaining. However, the best way to learn how to use most every computer program is by doing. So for everyone who has Illustrator, i encourage you to open the program and experiment as i go so that you can more easily familiarise yourself with the pen tool. For those of you who don't have access to Illustrator at home, there is a free 30 day trial download at [link=http://www.adobe.com]Adobe.com[/link] that you can also use. Adobe (as well as a number of other software providors) offers a discount price for students purchasing Illustrator ($40 in comparisson to like... $100 something) so if you have that money on hand i encourage you to seek out information on student discounts and take advantage of them. In Graphic Design you always need the best software on hand and that can be mighty expensive. Hording what you can while you're a student seems like a good strategy to me.
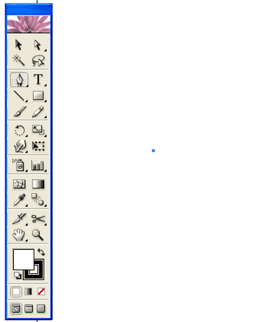
Anyway, with the Illustrator tool bar open the Pen Tool is the icon that has a little picture of the head of a fountain pen. When you select it then click an area of your document you'll create a little blue square (Figure 1). This little blue square is called an anchor point. At the beginning and end of every path (line segment) is an anchor point. These points separate paths within an object so you can alter one specific line.

Figure 1
After clicking once with the pen tool, you can click somewhere else to create another anchor point and connect the two with a straight line (Figure 2). By holding shift while you click the second time, you can constrain the angle of your straight line by 45 degrees, which can help you make exact shapes. You might have noticed that when you first clicked, your first anchor point was all blue and now that you've made another anchor point it's filled in white while the new one is filled blue. This is because the new anchor point is the one that is selected. If you click a third time (without deselecting the new anchor point), the next line will start off where the last one left off.

Figure 2
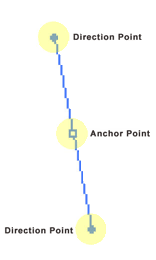
For people who are following along, you can delete this line now (you can do this by undoing everything, selecting everything then clearing it, whatever). Most graphics you'll create in illustrator won't just be made with straight lines. Fortunately, the brilliant minds behind the pen tool took this into consideration. To make a curved line, click an area of your document with the pen tool and drag. You'll notice a wierd line thing coming off of your anchor point with two little blue squares on either end of it (Figure 3). The line is called a direction line and the points are called direction points. These little thingies determine where your curved line is going to go.

Figure 3
This next bit may be a little hard to understand. The length and direction of the direction line will change the slope of your line. The longer the direction line is, the more extreme the slope will be. If you dragged the direction line downward, the line is going to curve up from the anchor point. If you dragged the direction line upward, the line will curve down. If you hold shift while you drag it'll constrain the direction line to multiples of 45 degrees as well.
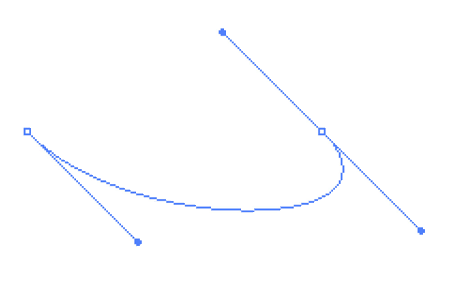
Let's try it and i'll explain it again more simply. If you click again and drag your next anchor point's direction line in the opposite direction of the first, you'll create a 'C' shaped curve (Figure 4). Think of it this way: when you're using an actual pen you pull it around where you want the line to go on the page. To make a shape like the one in Figure 4, you would pull down and to the right then back up and to the left. The pen tool in Illustrator is the same way. To make the shape in Figure 4, you would click and drag the direction line down and to the right, then click where you want the line to end, and drag the next direction line up and to the left. Got it?

Figure 4
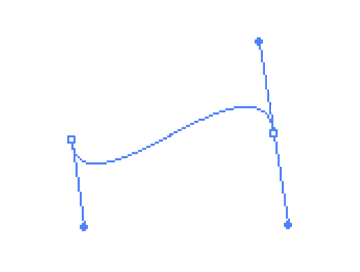
If you wanted to make an 'S' shaped curve instead (Figure 5), the pen tool would still follow the same principles. With a real pen the beginning and end of the shape in Figure 5 would be made with you dragging your pen down and to the right. In Illustrator it's the same exact thing! Using the pen tool click somewhere then drag the direction line down and to the right. Then click where you want the curve to end and drag down and to the right again. Tada! Illustrator's pen tool just fills in the middle part for you. Try fiddling around with the pen tool a little to get the hang of it. Once you get a grasp of how the direction lines will effect the slope of each curve's beginning and end, it won't be quite as difficult. Just keep in mind that all you need to determine is the beginning and end stroke, illustrator does everything else.

Figure 5
|
 |
 |
 |
 |
|
 |
 |
|
|
|
|
|
|
|
|
|
|
|
|
|
|
|
 Posted: Fri Oct 22, 2004 11:49 am Posted: Fri Oct 22, 2004 11:49 am
|
|
|
|
|
|
|
|
|
|
|
 Posted: Fri Oct 22, 2004 11:50 am Posted: Fri Oct 22, 2004 11:50 am
|
|
|
|
|
|
|
|
|
|
|
|
|
 Posted: Fri Oct 22, 2004 11:51 am Posted: Fri Oct 22, 2004 11:51 am
|
|
|
|
|
|
|
|
|
|
|
 Posted: Fri Oct 22, 2004 11:51 am Posted: Fri Oct 22, 2004 11:51 am
|
|
|
|
|
|
|
|
|
|
|
|
|
 Posted: Wed Oct 27, 2004 7:04 pm Posted: Wed Oct 27, 2004 7:04 pm
|
|
|
|
|
|
 |
|
|
|
|
|
|


